Before you get started on an at-home (or any) exercise program, you'll need to know the "gym names" of the major muscle groups you'll be working. I realize most already know this, but I want to make sure this base is covered before I proceed any further.
I'm going listing these in the general order that one should work them, which is from big muscles to small per body area. Why? Because generally speaking, in order to fully work a big muscle group you must enlist the assistance of the smaller muscle groups. Therefore, if you work the smaller ones first they're likely to poop out from exhaustion before you can get max benefit out of working the bigger muscle groups. Make sense?
Oh, and by the way, if you are working your whole body in one day it doesn't matter if you do lower body first or upper, but I usually save core for last, because it seems to assist in almost EVERYthing.
So here we go-
Lower body:
Quads- These are the quadriceps, a set of four muscles that compose the front of the thigh.
Hamstrings- A set of mainly three muscles that compose the back of the thigh.
Calves- Er.... you DO know what the calves are.... right?
Glutes- These mainly are the three muscles (Gluteus Maximus, Medius, and Minimus) that make up the butt. I almost didn't mention glutes, because many people don't target the butt specifically- It generally gets hit when you work the hamstrings.
Upper Body:
Pecs- This refers to all the muscles of the chest.
Back- This refers to all the muscles of the back, although I'm gonna break it down a bit further, because there are three main areas of the back that people often talk about targeting. They are:
Lats- Short for Latissimus Dorsi, these are the big muscles that flare out to the sides of the upper back in muscular people.
Traps- Short for Trapezius, this is a big, kite shaped muscle that goes from the bottom of the head and flares out to the shoulder blades, then down towards the small of the back. This is the muscle that you can often see bulging between the shoulders and the neck on muscular people.
Lower Back- Many skip working this important area, but make sure that you don't, because a strong low-back makes for a tighter waistline.
Delts- Short for Deltoids, this refers to all of the muscles that make up the shoulders.
Tri's- Short for Triceps- These are the muscles that make up the back of the upper arm.
Bi's- Short for biceps, these are the muscles that make up the front of the upper arm.
Yes, I put triceps before biceps. Why? Tri's are quite a lot larger than Bi's. It's just that they don't stand up off of the arm as much, so people don't realize this.
And then the Abs (the tummy), which I always break down into three different groups, although a lot of people just lump them together:
Upper abs- generally between the belly button and the rib cage.
Lower abs- generally between the pubic bone and the belly button.
Obliques- the sides of the waistline.
Let me clarify something- the muscles that make up the upper and lower abs are the same. They run all the way down from the rib cage to the pubic bone. BUT, it is possible to target one area of a muscle, and I've found it beneficial to work the lower abs often as a separate group.
This is not an exhaustive list of muscles, it's just the main ones that you hear people referring to when discussing exercise.
Anyone reading this? Questions?
Saturday, March 6, 2010

Friday, March 5, 2010
Getting started with exercise at home, part II
I'm preparing to discuss how get get started using that at-home exercise equipment I described earlier.
But before I do, there are a couple of terms you need to understand. I realize most people already know these, but you never know....
Rep- Short for "repetition", a rep simply means the complete execution of an exercise. So for instance in a dumbbell curl, one rep means from the starting position with your arms fully extended to the contracted position where the weight is brought up by your shoulders back to the starting position is one "rep".
Set- A set is performing more than one repetition at at time. So if I am going to do a set of 12 dumbbell curls, I'll be doing 12 repetitions in a row without stopping. (Or at least without QUITTING! Sometimes I have to pause because I've chosen a weight that is really too high to complete my set.)
So, if someone is going to do 3 sets of 12 reps, they will do an exercise 12 times, from start to finish, then take a break and do the same thing two more times.
Make sense?
Any other exercise terms anyone is confused about? Let's get those discussed and out of the way, and then I'll move on to body parts...........
But before I do, there are a couple of terms you need to understand. I realize most people already know these, but you never know....
Rep- Short for "repetition", a rep simply means the complete execution of an exercise. So for instance in a dumbbell curl, one rep means from the starting position with your arms fully extended to the contracted position where the weight is brought up by your shoulders back to the starting position is one "rep".
Set- A set is performing more than one repetition at at time. So if I am going to do a set of 12 dumbbell curls, I'll be doing 12 repetitions in a row without stopping. (Or at least without QUITTING! Sometimes I have to pause because I've chosen a weight that is really too high to complete my set.)
So, if someone is going to do 3 sets of 12 reps, they will do an exercise 12 times, from start to finish, then take a break and do the same thing two more times.
Make sense?
Any other exercise terms anyone is confused about? Let's get those discussed and out of the way, and then I'll move on to body parts...........
Saturday, February 27, 2010
New Progress Pics
For anyone who is interested in seeing my progress, here are photos taken of me last Tuesday, the 23rd of February, 2010.
My hair and makeup are not done and I still have a LOT to learn about posing (basically, my posing sucks!) but these give a bit of an idea about my progress.
A triceps shot. That is NOT fat on my arms! I'm quite proud of the muscle thickness in my upper arms- I'm not genetically predisposed to have big upper body muscles, so I've worked hard for it!

Full side view, flexed (the flash washed out quite a bit of muscle definition in these pics)

Rear view. Don't really like this one, but since you got a rear view before, I thought it was only fair to put an updated one in (my lower body is always the last thing to come around):

And here I am, not flexing:

If I'd have pumped weights before the pics were taken I'd look more "ripped" (I actually have really nice definition in my upper body when I'm pumped), but there are two points I want to continue to drive home with these photos:
1.) I'm 43 and have had four babies, so it is NEVER too late to improve yourself.
And B.) Eating well and exercising really can reap big dividends. Not only in appearance, but in length and quality of ones life. Please believe me: I am not athletic. Were it not for lack of coordination, speed, and agility, I'd have been a GREAT athlete. :-) I've always shied away from team sports and NO ONE in my family is athletic. It's not like genetics were on my side. Consequently, I know for sure that this is attainable for ANYone. No kidding! You (yes, you- sitting there reading this!) can vastly improve your health and appearance, too. This isn't unique to me.
It's all a choice.
My hair and makeup are not done and I still have a LOT to learn about posing (basically, my posing sucks!) but these give a bit of an idea about my progress.
A triceps shot. That is NOT fat on my arms! I'm quite proud of the muscle thickness in my upper arms- I'm not genetically predisposed to have big upper body muscles, so I've worked hard for it!

Full side view, flexed (the flash washed out quite a bit of muscle definition in these pics)

Rear view. Don't really like this one, but since you got a rear view before, I thought it was only fair to put an updated one in (my lower body is always the last thing to come around):

And here I am, not flexing:

If I'd have pumped weights before the pics were taken I'd look more "ripped" (I actually have really nice definition in my upper body when I'm pumped), but there are two points I want to continue to drive home with these photos:
1.) I'm 43 and have had four babies, so it is NEVER too late to improve yourself.
And B.) Eating well and exercising really can reap big dividends. Not only in appearance, but in length and quality of ones life. Please believe me: I am not athletic. Were it not for lack of coordination, speed, and agility, I'd have been a GREAT athlete. :-) I've always shied away from team sports and NO ONE in my family is athletic. It's not like genetics were on my side. Consequently, I know for sure that this is attainable for ANYone. No kidding! You (yes, you- sitting there reading this!) can vastly improve your health and appearance, too. This isn't unique to me.
It's all a choice.
Friday, February 26, 2010
Getting started with exercise at home.
Here is my list, in what I feel is order of importance, of things someone who is new (or just coming back after a break of years) to exercise would need to start an at-home exercise program:
1.) An instructional book on weight lifting. I don't care if it's designed for men or women because we all lift weights the same way, but it needs to have a good description of many different weight-lifting exercises for all body parts, because eventually you're gonna get bored with doing the same stuff and want to change it up. Plus, change is good for muscle growth and symmetry.
It is better to lift correctly with no weights than incorrectly with weights, so pay close attention to the technique instruction in the book!
2.) Dumbbells. If you are a woman I'd recommend starting with two each of 1 lb, 3 lb, 5 lb, 7 lb (if you can find them), 8 lb, and 10 lb. For a man I'd recommend starting with two each 5 lb, 8 lb, 10 lb, 15 lb, 18 lb (if you can find them), and 20 lb. The cheapest iron ones will do. That's what I have. As you grow stronger you can go out and buy two dumbbells in the next size up. This keeps the cost in check, as well.
If you cannot get dumbbells, don't despair! I worked out when my children were small and we were flat broke with cans of food!
3.) An adjustable (you can make it taller) step aerobics bench. This not only works for it's obvious purpose, but it doubles as a weight lifting bench for most exercises requiring a bench. And it's usually cheaper.
4.) A step or other kind of cardio DVD. I like step best because it gets my heart rate going in a small amount of square footage. This is great for getting in cardio on those days that you can't get outside for a walk or rualk (run-walk). I have a bunch of aerobics DVDs because the same one over and over gets monotonous.
5.) An exercise ball appropriate for your height. Between this and the step bench, my need for a traditional weight lifting bench at home is pretty much gone.
Next blog, I'll talk about getting started on a program. But I'll bet you can already figure out a lot of things on your own, just from reading this list. :-)
1.) An instructional book on weight lifting. I don't care if it's designed for men or women because we all lift weights the same way, but it needs to have a good description of many different weight-lifting exercises for all body parts, because eventually you're gonna get bored with doing the same stuff and want to change it up. Plus, change is good for muscle growth and symmetry.
It is better to lift correctly with no weights than incorrectly with weights, so pay close attention to the technique instruction in the book!
2.) Dumbbells. If you are a woman I'd recommend starting with two each of 1 lb, 3 lb, 5 lb, 7 lb (if you can find them), 8 lb, and 10 lb. For a man I'd recommend starting with two each 5 lb, 8 lb, 10 lb, 15 lb, 18 lb (if you can find them), and 20 lb. The cheapest iron ones will do. That's what I have. As you grow stronger you can go out and buy two dumbbells in the next size up. This keeps the cost in check, as well.
If you cannot get dumbbells, don't despair! I worked out when my children were small and we were flat broke with cans of food!
3.) An adjustable (you can make it taller) step aerobics bench. This not only works for it's obvious purpose, but it doubles as a weight lifting bench for most exercises requiring a bench. And it's usually cheaper.
4.) A step or other kind of cardio DVD. I like step best because it gets my heart rate going in a small amount of square footage. This is great for getting in cardio on those days that you can't get outside for a walk or rualk (run-walk). I have a bunch of aerobics DVDs because the same one over and over gets monotonous.
5.) An exercise ball appropriate for your height. Between this and the step bench, my need for a traditional weight lifting bench at home is pretty much gone.
Next blog, I'll talk about getting started on a program. But I'll bet you can already figure out a lot of things on your own, just from reading this list. :-)
Thursday, January 21, 2010
Pictures of my progression.....
I'm very serious when I say if you don't want to see pics of me in a bikini, don't view this blog! I don't want to offend anyone without warning. :-)
This blog is going to be different than my others. Instead of sharing my insights on different aspects of fitness, I am going to share some before and after photos of myself in my fitness journey. I am by no means done, but I want to give people a realistic look at what can (and cannot) be accomplished when one applies ones self to living a fit life style.
I don't look at these pics as sexual, I look at them as a photo documentary of one helluva lot of hard work. And I'm not trying to brag, so please don't think ill of me. My only motivation truly is to help others with these photos. And yes, my husband knows about this.... He's the one who put the photos side by side for me, and he subscribes to my blog. So don't worry about that! :-)
Okay, first photo:
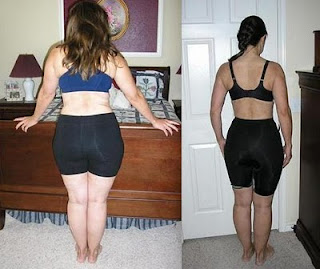
The left pic was taken September 2nd, 2005. I believe I was very close to my heaviest weight in this photo of about 197 pounds. I did NOT like having my pic taken for this, which is apparent by my stance. I was almost to a point of self-loathing for what I had let myself become. But I never did completely give up. The right was taken January 13th, 2010. In this one, I am about 160 pounds. I know the bike shorts are dorky, but I was trying to replicate the first photo as much as possible.

In the above left pic it is October 26th, 2006, and I weigh 181 pounds. Of course, the one on the right is January 13th 2010, and I am 160 pounds. That might give you some idea of the difference a 21 pound fat loss and added muscle can make on a woman.
The next two photos I am really excited about! By my wearing a bikini they but show better what can be accomplished in just 3 1/2 months of really applying oneself with eating right and exercising hard:


The ones on the right were taken on October 5th 2009. I weighed 171 pounds. The ones on the left were taken two days ago, January 20th 2010, at 159.4 pounds. Look at the difference just 11 1/2 pound can make!
I share these because I know there are television progams and product promotions out there that show dramatic changes in 12 weeks or less. It is easy to get discouraged when you see people go from flabby to fit so quickly, yet despite your best efforts it's not happening to you. Comparitively, this is what I did through seriously applying myself (did have a few "off" days during the holidays), over the course of 3 & 1/2 months. Can you make a change for the better? You bet! Will you look like Arnold or Beyonce when you get done? Er..... Probably not.
Also, I'd like to point out that you can make these kinds of changes despite circumstances. During the past 3 1/2 months I have been working on my body intensely a lot has happened, to include a death in the family and me getting braces on my mouth. Never mind the holidays, having six of the seven kids here, 6 immediate family birthdays (Yes, SIX between the times the bikini before and after pics were taken) and making two major holiday meals.
My point? You CAN overcome obstacles and work through them. It's just a matter of making up your mind you will do it, and not giving up when you fall behind.
Hey, life is going to happen, but fat doesn't have to!
Let me know what you think! I realize this post is probably going to raise some eyebrows, but if it inspires or helps someone else, I don't care!
Oh, and I am not done. Far from it! I'll NEVER be done improving and challenging myself. I hope you never are, either.
This blog is going to be different than my others. Instead of sharing my insights on different aspects of fitness, I am going to share some before and after photos of myself in my fitness journey. I am by no means done, but I want to give people a realistic look at what can (and cannot) be accomplished when one applies ones self to living a fit life style.
I don't look at these pics as sexual, I look at them as a photo documentary of one helluva lot of hard work. And I'm not trying to brag, so please don't think ill of me. My only motivation truly is to help others with these photos. And yes, my husband knows about this.... He's the one who put the photos side by side for me, and he subscribes to my blog. So don't worry about that! :-)
Okay, first photo:

The left pic was taken September 2nd, 2005. I believe I was very close to my heaviest weight in this photo of about 197 pounds. I did NOT like having my pic taken for this, which is apparent by my stance. I was almost to a point of self-loathing for what I had let myself become. But I never did completely give up. The right was taken January 13th, 2010. In this one, I am about 160 pounds. I know the bike shorts are dorky, but I was trying to replicate the first photo as much as possible.

In the above left pic it is October 26th, 2006, and I weigh 181 pounds. Of course, the one on the right is January 13th 2010, and I am 160 pounds. That might give you some idea of the difference a 21 pound fat loss and added muscle can make on a woman.
The next two photos I am really excited about! By my wearing a bikini they but show better what can be accomplished in just 3 1/2 months of really applying oneself with eating right and exercising hard:


The ones on the right were taken on October 5th 2009. I weighed 171 pounds. The ones on the left were taken two days ago, January 20th 2010, at 159.4 pounds. Look at the difference just 11 1/2 pound can make!
I share these because I know there are television progams and product promotions out there that show dramatic changes in 12 weeks or less. It is easy to get discouraged when you see people go from flabby to fit so quickly, yet despite your best efforts it's not happening to you. Comparitively, this is what I did through seriously applying myself (did have a few "off" days during the holidays), over the course of 3 & 1/2 months. Can you make a change for the better? You bet! Will you look like Arnold or Beyonce when you get done? Er..... Probably not.
Also, I'd like to point out that you can make these kinds of changes despite circumstances. During the past 3 1/2 months I have been working on my body intensely a lot has happened, to include a death in the family and me getting braces on my mouth. Never mind the holidays, having six of the seven kids here, 6 immediate family birthdays (Yes, SIX between the times the bikini before and after pics were taken) and making two major holiday meals.
My point? You CAN overcome obstacles and work through them. It's just a matter of making up your mind you will do it, and not giving up when you fall behind.
Hey, life is going to happen, but fat doesn't have to!
Let me know what you think! I realize this post is probably going to raise some eyebrows, but if it inspires or helps someone else, I don't care!
Oh, and I am not done. Far from it! I'll NEVER be done improving and challenging myself. I hope you never are, either.
Thursday, January 14, 2010
Exercise- Your non-negotiable appointment with yourself.
How do I manage to keep up a 5-day-a-week exercise schedule? I make it a non-negotiable appointment with myself. If I didn't, I'd find every excuse in the book to not do it.
Exercise and self-care don't happen by accident. You have to be purposeful.
If necessary (and it probably is), write it down on the calendar, or your day-timer, or wherever you keep your appointments. And then make it non-negotiable. I mean, aside from an emergency (and by emergency, I mean an-ambulance-has-to-be-called-emergency), nothing is going to stop you from getting your workout.
There have been a few days when things happened and I couldn't get to the gym. For instance, we had a very unexpected snow storm here in Texas (THAT was weird!). Not only was the gym closed, but driving there was treacherous on untreated roads. So, I got up early before the family was awake and did step aerobics with a DVD in the living room and lifted weights with my dumbbells in the bathroom. (In case that sounds weird, my workout equipment is in a closet in the master bath.) If I wouldn't have had dumbbells at home, I'd of made it work with body-weight exercises. But I sure wouldn't have done nothing.
The point is, I made it happen, anyway.
It's a difficult way to start thinking at first, but eventually it's a habit and something you can't imagine not doing. Your family gets used to it being important to you... it all starts to fall into place.
But you have to take the first step: You have to schedule your exercise.
Exercise and self-care don't happen by accident. You have to be purposeful.
If necessary (and it probably is), write it down on the calendar, or your day-timer, or wherever you keep your appointments. And then make it non-negotiable. I mean, aside from an emergency (and by emergency, I mean an-ambulance-has-to-be-called-emergency), nothing is going to stop you from getting your workout.
There have been a few days when things happened and I couldn't get to the gym. For instance, we had a very unexpected snow storm here in Texas (THAT was weird!). Not only was the gym closed, but driving there was treacherous on untreated roads. So, I got up early before the family was awake and did step aerobics with a DVD in the living room and lifted weights with my dumbbells in the bathroom. (In case that sounds weird, my workout equipment is in a closet in the master bath.) If I wouldn't have had dumbbells at home, I'd of made it work with body-weight exercises. But I sure wouldn't have done nothing.
The point is, I made it happen, anyway.
It's a difficult way to start thinking at first, but eventually it's a habit and something you can't imagine not doing. Your family gets used to it being important to you... it all starts to fall into place.
But you have to take the first step: You have to schedule your exercise.
Wednesday, December 30, 2009
Squatting Re-learned
The biggest difference to my body since I've started working with a personal trainer is my hips. I'm convinced that it's because the man has me squatting so much. Just about every single time we work lower body he has me doing some kind of squat. I keep telling him that he's squatting me to death!
I'll be the first to admit that I don't really like squats. Never have. They're hard, and I've always been afraid of injuring myself. The first time I did squats I did them too many times with too much weight and employed bad technique. I literally hurt my whole body. I could barely walk for a week or so. I probably should have gone to the hospital. Ever since then I've been leery of squats. But knowing what I do now, I think squatting should always be included in a lower body workout. Even when you dislike them like I do.
As mentioned in my last blog, my trainer is a power lifter. Therefore, the man knows about squats! Here are some things I've learned from him that might help you:
1. Take a wider stance than you think you need to (shoulder-width apart is usually a little wider than you think it is), and turn your toes slightly OUT. The way most of us learned, with toes pointing forward, isn't necessarily best. After doing some research I discovered that the toes-pointed-out version of the squat is a power-lifting stance. I'd had problems with my knees when I did squats with my toes pointed forward before, but haven't since I've started doing them with my toes out. My guess? The risk of injury to the knees is lessened in this position. I think power lifters, bearing those huge amounts of weight, discovered this long ago.
The other advantage to turning toes out is that it more recruits the inner thigh muscles. This not only involves more muscle in the exercise, therefore giving you more power, but also tones up this area faster than anything else I've tried for inner thigh to date.
2. Stay in your heels! Ross has had to work to drill it through my head to stay far, far back on my heels all the way through the move. This helps to keep the knee from jutting too far out over the toe and puts the emphasis where it needs to be- on the quads and glutes. Lean back hard on your heels on the way down and drive up through them on the way up. I'm so far back on my heels when I squat that my toes are almost lifted off the floor, and Ross often STILL tells me that I'm too much on the front of my foot. He harps on me about heels more than anything else. Evidently, it's a pretty important point to squatting.
3. You aren't going down low enough! I'm sure you've heard of the hard and fast "Don't let your thighs go below parallel to the ground" rule. This is a very valid rule, and you should follow it. However, parallel to the ground is MUCH lower than you think it is! When I finally got myself low enough that Ross approved, I felt like my butt was going to hit the backs of my shins. When I watched Ross do it, I thought it looked like HIS butt was going to hit the backs of his shins! But here's the thing- it's the FRONT of your thigh you are wanting to have parallel to the ground, not the back. If you have thick thighs like me, parallel is a very different thing when you are considering the front of your thighs as opposed to the back. I'll be honest: Coming down low like this is uncomfortable and awkward- especially at first! But it's recruiting more muscle, and therefore giving you a much better workout.
4. Your knees aren't out as far as you think they are. Another thing that I worried about with squatting in the past is the position of my knee over my toe. It's a widely known fact that when doing any kind of exercise your knees should not project past your toes. However, the execution of your heels as described in point #2 above prevents your knees from coming out too far and causing damage. So.... if you employ point #2(heels), it will ensure you don't hurt yourself with point #3(thighs parallel). Make sense?
5. Look strait ahead! This has probably been the hardest habit for Ross to break with me. I thought constantly looking down at my knees to ensure they weren't jutting past my toes was a good thing. But it was throwing me out of alignment, raising my risk of injuring myself. When you look to the side while squatting you subconsciously swing ever so slightly to one side, putting uneven stress on your joints, especially your knees. Pretend your neck is in a brace and look strait ahead!
6. If you are a woman, don't be afraid of squats! They do GREAT things for a woman's rear view!
After a hard squatting workout I always find it interesting that some part of my upper body (usually shoulders) is more sore and feels better worked than it did when I work that same body part specifically. That's because, while generally targeted for the quadricep (front of thigh) and glute (butt) muscles, squats literally involve the whole body, making muscles work in ways they've never been challenged before. And THAT'S a whole lot of bang for your exercise buck!
I'll be the first to admit that I don't really like squats. Never have. They're hard, and I've always been afraid of injuring myself. The first time I did squats I did them too many times with too much weight and employed bad technique. I literally hurt my whole body. I could barely walk for a week or so. I probably should have gone to the hospital. Ever since then I've been leery of squats. But knowing what I do now, I think squatting should always be included in a lower body workout. Even when you dislike them like I do.
As mentioned in my last blog, my trainer is a power lifter. Therefore, the man knows about squats! Here are some things I've learned from him that might help you:
1. Take a wider stance than you think you need to (shoulder-width apart is usually a little wider than you think it is), and turn your toes slightly OUT. The way most of us learned, with toes pointing forward, isn't necessarily best. After doing some research I discovered that the toes-pointed-out version of the squat is a power-lifting stance. I'd had problems with my knees when I did squats with my toes pointed forward before, but haven't since I've started doing them with my toes out. My guess? The risk of injury to the knees is lessened in this position. I think power lifters, bearing those huge amounts of weight, discovered this long ago.
The other advantage to turning toes out is that it more recruits the inner thigh muscles. This not only involves more muscle in the exercise, therefore giving you more power, but also tones up this area faster than anything else I've tried for inner thigh to date.
2. Stay in your heels! Ross has had to work to drill it through my head to stay far, far back on my heels all the way through the move. This helps to keep the knee from jutting too far out over the toe and puts the emphasis where it needs to be- on the quads and glutes. Lean back hard on your heels on the way down and drive up through them on the way up. I'm so far back on my heels when I squat that my toes are almost lifted off the floor, and Ross often STILL tells me that I'm too much on the front of my foot. He harps on me about heels more than anything else. Evidently, it's a pretty important point to squatting.
3. You aren't going down low enough! I'm sure you've heard of the hard and fast "Don't let your thighs go below parallel to the ground" rule. This is a very valid rule, and you should follow it. However, parallel to the ground is MUCH lower than you think it is! When I finally got myself low enough that Ross approved, I felt like my butt was going to hit the backs of my shins. When I watched Ross do it, I thought it looked like HIS butt was going to hit the backs of his shins! But here's the thing- it's the FRONT of your thigh you are wanting to have parallel to the ground, not the back. If you have thick thighs like me, parallel is a very different thing when you are considering the front of your thighs as opposed to the back. I'll be honest: Coming down low like this is uncomfortable and awkward- especially at first! But it's recruiting more muscle, and therefore giving you a much better workout.
4. Your knees aren't out as far as you think they are. Another thing that I worried about with squatting in the past is the position of my knee over my toe. It's a widely known fact that when doing any kind of exercise your knees should not project past your toes. However, the execution of your heels as described in point #2 above prevents your knees from coming out too far and causing damage. So.... if you employ point #2(heels), it will ensure you don't hurt yourself with point #3(thighs parallel). Make sense?
5. Look strait ahead! This has probably been the hardest habit for Ross to break with me. I thought constantly looking down at my knees to ensure they weren't jutting past my toes was a good thing. But it was throwing me out of alignment, raising my risk of injuring myself. When you look to the side while squatting you subconsciously swing ever so slightly to one side, putting uneven stress on your joints, especially your knees. Pretend your neck is in a brace and look strait ahead!
6. If you are a woman, don't be afraid of squats! They do GREAT things for a woman's rear view!
After a hard squatting workout I always find it interesting that some part of my upper body (usually shoulders) is more sore and feels better worked than it did when I work that same body part specifically. That's because, while generally targeted for the quadricep (front of thigh) and glute (butt) muscles, squats literally involve the whole body, making muscles work in ways they've never been challenged before. And THAT'S a whole lot of bang for your exercise buck!
Subscribe to:
Posts (Atom)